eLearn Administration
Assigning Content to Schools
Give schools and groups access to licensed eLearn content, mark it required with a due date, and email the staff who have it.
Your district licenses eLearn content once, at the district level. Assigning a product decides which schools and groups can use it. This is how you roll out a district PD requirement (every elementary school completes a writing course by November), give onboarding content to the schools hiring new teachers, or open an optional course to everyone.
Role requirement: system_administrator
Assignments go to organizations (schools, groups, or the district), not to individual people. Everyone who belongs to an assigned organization gets the content. The one way to require a course for a single teacher is an observer’s Require Course on an observation; see Content Mapping.
The Products page
Section titled “The Products page”Open the gear icon, then System Administration > LEARN > Products. The page (“manage licensed products”) shows one card for each course, assessment, learning path, content library, or other item your district is licensed for.
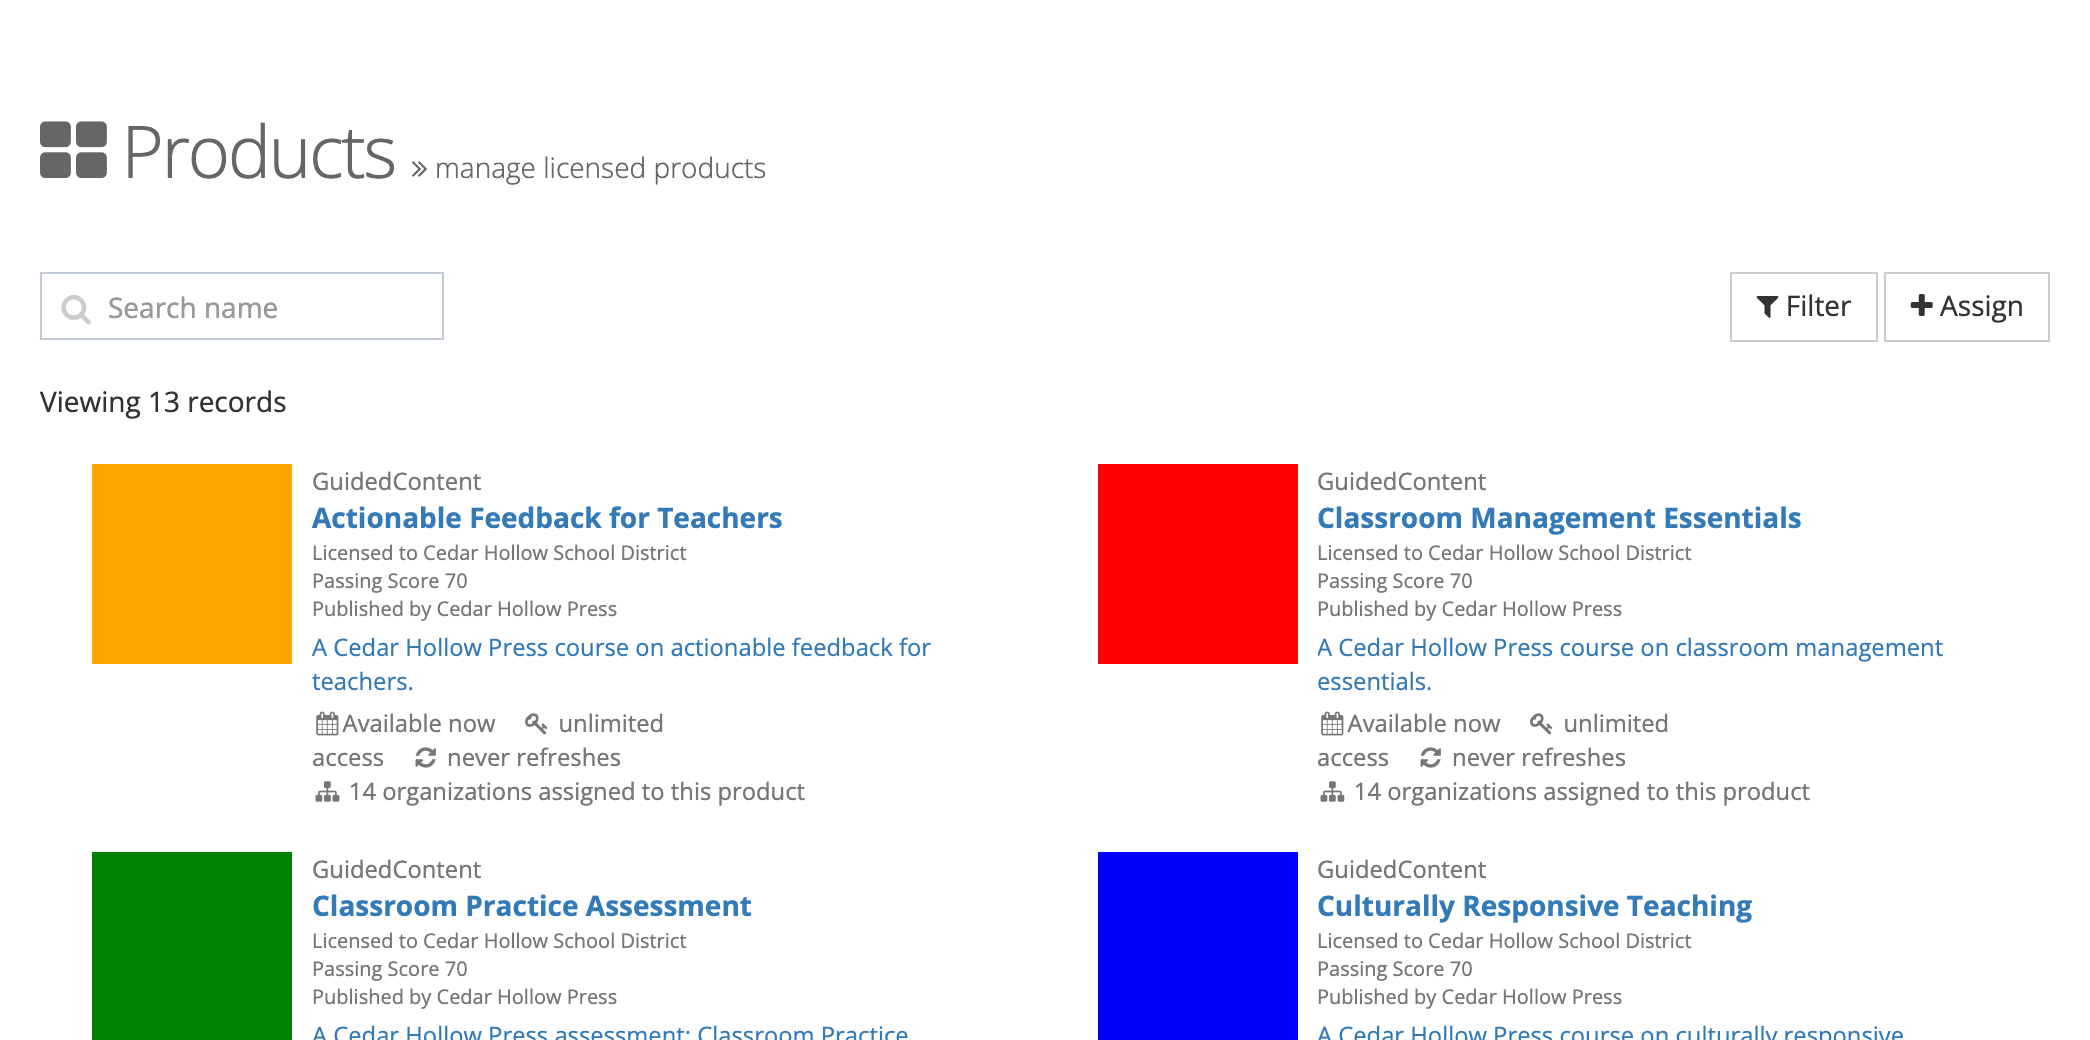
Each card shows:
- The content type and item number, then the product name.
- Licensed to the organization that holds the license, the Passing Score if one is set, and Published by the content provider.
- When the license is available (for example Available now), how many seats it allows (unlimited access or a used/limit count), whether seats refresh, and how many organizations are assigned to the product.
Use Search name to find a product. Filter narrows the list to chosen bundles. Assign opens Assign Contents, which assigns several products at once (see Assign many products at once).
A product’s Assignments tab
Section titled “A product’s Assignments tab”Select a product card to open it. The header repeats the card details and adds the certificate (if any), how often enrollments reset (for example Courses will never be reset), and the passing score.
Learning paths and content libraries also have a Bundled Products tab listing the items inside the bundle. Every product has an Assignments tab, with a count badge.
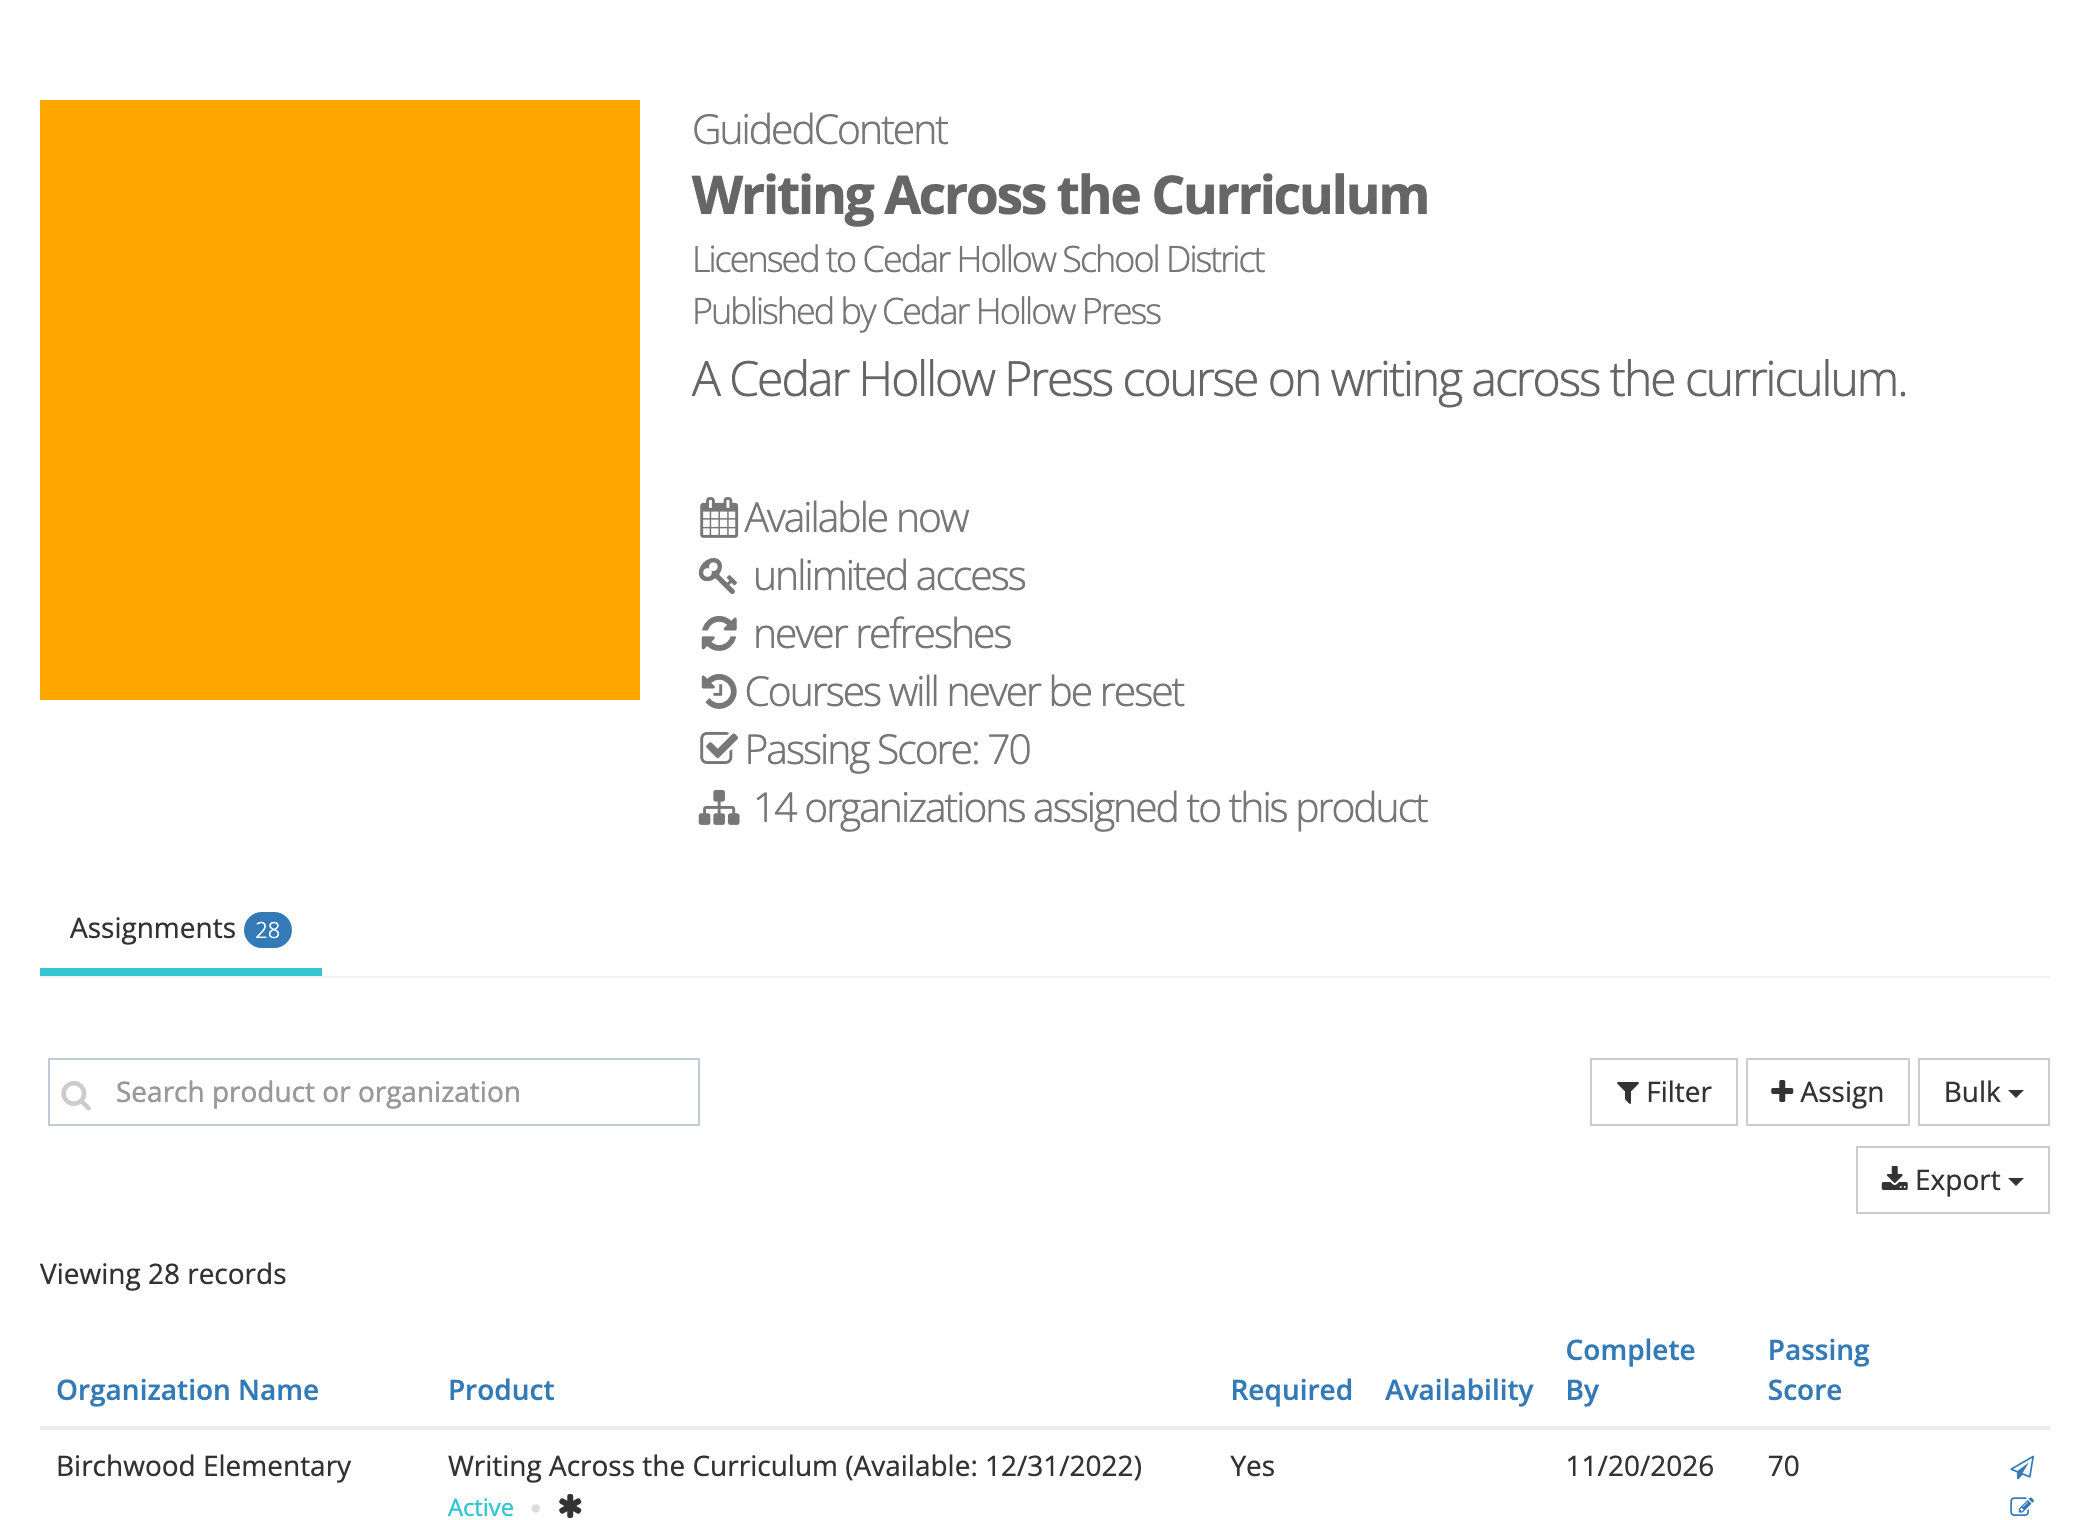
The table lists one row per assigned organization, with Organization Name, Product, Required, Availability, Complete By, and Passing Score. Select a column heading to sort. Under the product name, each row shows Active or Inactive, and icons for required content (asterisk), content recorded on the transcript (archive box), and proctored content (a standing figure).
Use Search product or organization or Filter (the Filter Assignments window, by Organizations, and by Products for a bundle) to narrow the list. The Bulk actions work on the rows that match your search and filter.
Assign content to a school
Section titled “Assign content to a school”- Open the product from Products.
- On the Assignments tab, select Assign. The Assign Content window opens.
- Set Assign All Organizations? to No, then choose the schools or groups in Organizations. Leave it on Yes to assign every organization (the hint shows how many, for example “Assign all 15 organizations”).
- For a learning path or content library, Assign All Products? controls whether every bundled item is assigned. Set it to No to choose items in Products.
- Fill in the settings below, then select Save. A progress window shows while the assignments are saved.
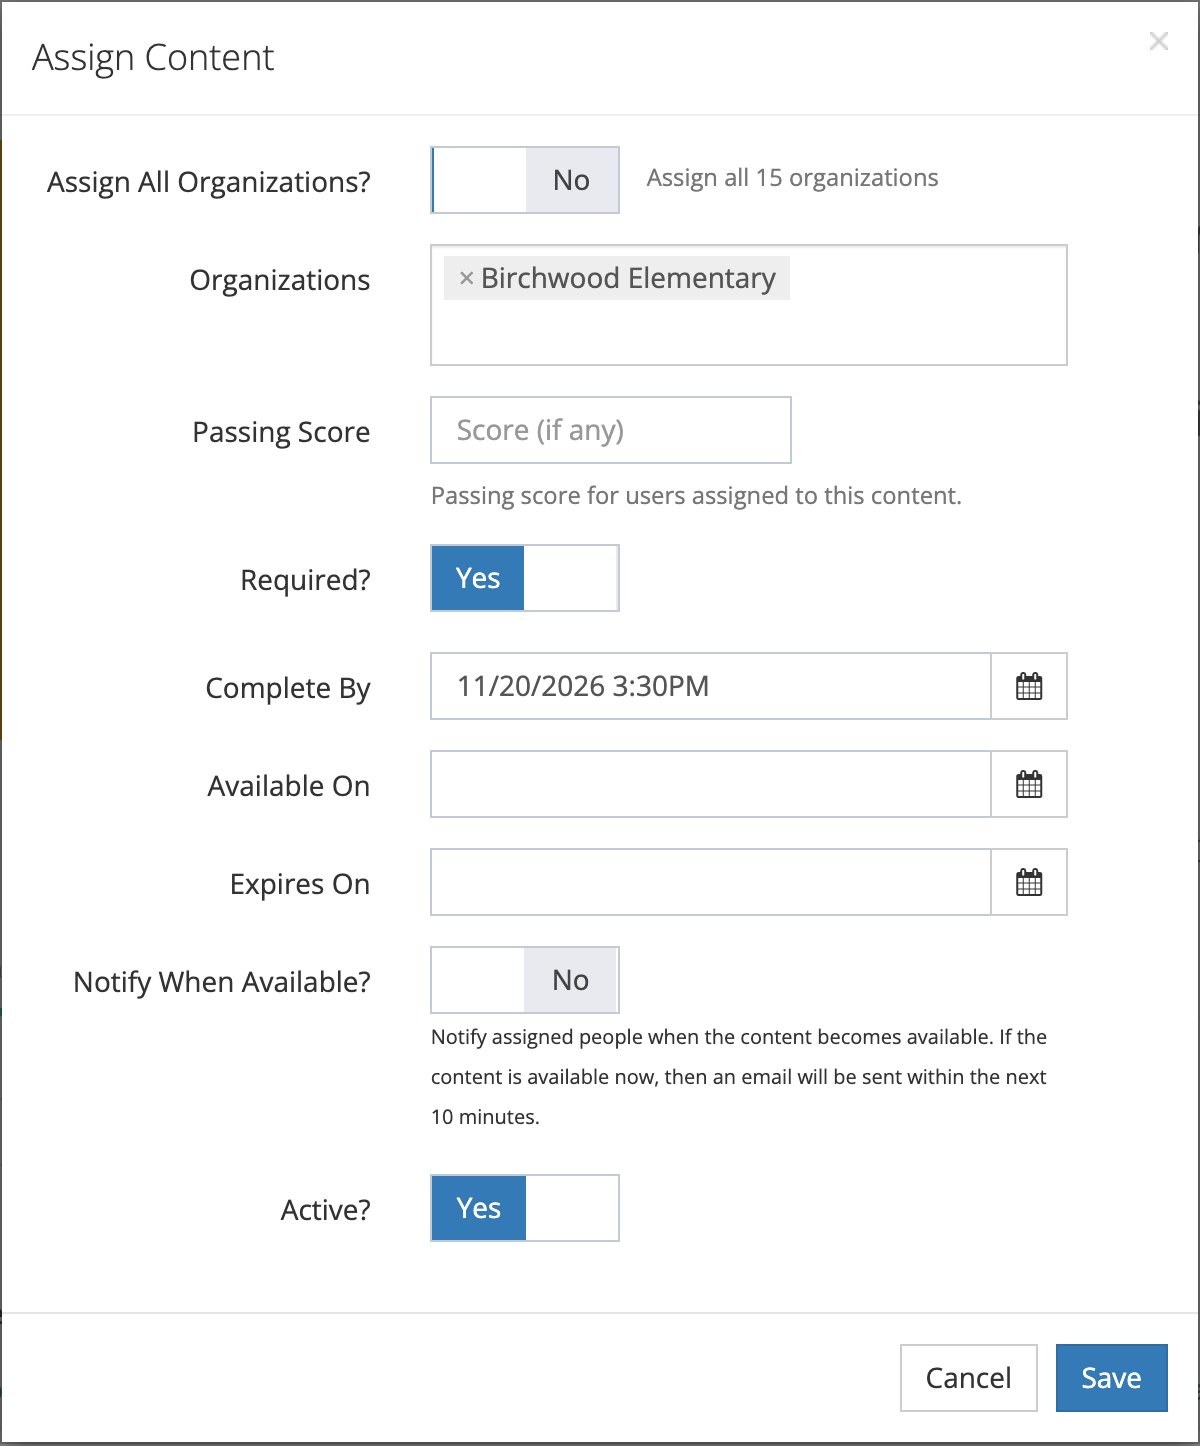
| Field | What it does |
|---|---|
| Passing Score | ”Passing score for users assigned to this content.” Leave it blank to use the product’s own passing score. |
| Required? | Marks the content required for everyone in the chosen organizations. |
| Complete By | The due date and time shown with a required item. Times use your district’s time zone. |
| Available On | The first date staff can open the content. Leave blank for now. |
| Expires On | The date the assignment stops giving access. Leave blank for no end. |
| Notify When Available? | ”Notify assigned people when the content becomes available. If the content is available now, then an email will be sent within the next 10 minutes.” |
| Active? | Turn off to keep the assignment on file without giving access. |
If an organization already has the product, saving replaces that assignment’s settings with what is in the window. Check Assign All Organizations? before you save: leaving it on Yes rewrites the settings for every assigned school, not only the new one.
Change or remove assignments
Section titled “Change or remove assignments”- Edit one assignment: select the pencil icon on its row. Edit Product Assignment has the same settings as above. Notify When Available? no longer appears once that notification has been sent.
- Bulk Edit: Bulk > Bulk Edit opens Edit Assignments for every row that matches your search and filter. Check the box beside each setting you want to change. “Only values with the boxes checked will be updated.”
- Bulk Remove: Bulk > Bulk Remove opens Remove Assignments, which states how many assignments match and asks you to confirm with Remove. Removing an assignment takes the content away from that organization’s staff. It also deletes each person’s current enrollment in that content, finished or not (assessments excepted), unless they have the same product through another organization.
- Export: Export > Export CSV or Export PDF exports the assignment list. A progress window shows while the file is built.
Email staff about an assignment
Section titled “Email staff about an assignment”Districts often pair a new requirement with a direct message so teachers know where to find it.
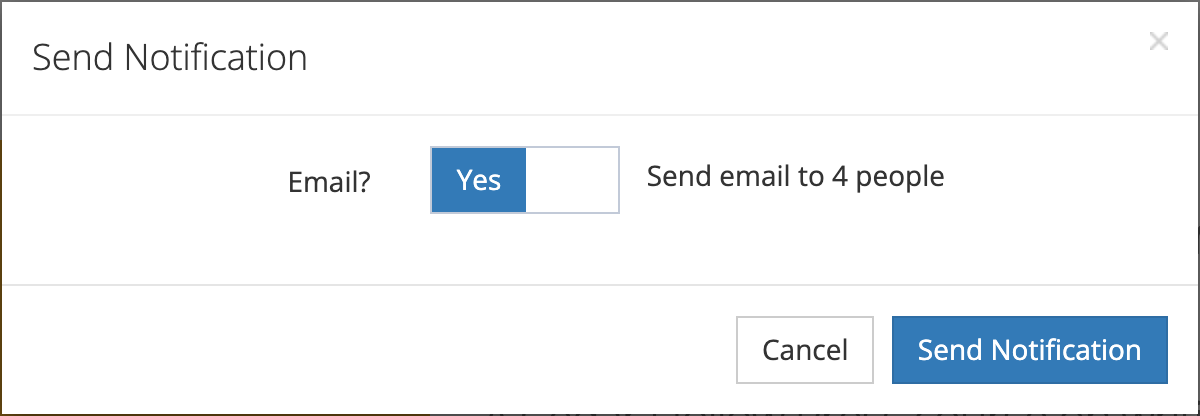
- One organization: select the paper-plane icon on its row. Send Notification shows how many people the email goes to. Leave Email? on Yes and select Send Notification.
- Many organizations: Bulk > Bulk Notify opens Notify Users, which says how many users will be notified about how many products, based on your current search and filter. Select Save to send.
Assign many products at once
Section titled “Assign many products at once”On the Products page, Assign opens Assign Contents. It works like Assign Content, with one more choice: Assign All Products? (or choose specific items in Products). Use it at the start of a school year to give every school the full catalog in one step. The same caution applies: organizations that already have a product get their settings replaced.
What teachers see
Section titled “What teachers see”Once an assignment is active and available, staff in that organization find the content in the LEARN section of My Home (for example under Courses or Assessments).
- A required item shows Required, with “by” and the Complete By date, on its card until the teacher completes it. The content list’s Required filter shows only required items.
- The Required Content tab on My Dashboard and the Required Content section of the Learn page appear only for a user who also has a course required by an observer (Require Course). A teacher whose only required items come from school assignments does not see that tab, so point them to the content list instead.
- Reporters track completion against the due date in the Required Progress Report.