

Administration
Managing Users and Organizations
Add staff, assign roles and schools, suspend, archive, or remove accounts, and set up the schools and groups in your district.
Every person who signs in belongs to one or more organizations: your district, its schools, a district office, or a group such as a new-teacher cohort. Their roles decide what they can do, and their organizations decide where they can do it. A principal with the observer role can observe the teachers in her building; an instructional coach who serves three schools belongs to all three.
You manage both from System Administration: Manage Users for people and Organizations/Groups for schools and groups.
Role: system administrator. Organization administrators do not see System Administration.
How far your access reaches
Section titled “How far your access reaches”A system administrator who belongs to the district organization itself (for example, Cedar Hollow School District) sees every user and every organization in the district. A system administrator who belongs only to some schools sees the users and organizations within those schools. If a colleague says users are missing from their list, check their Authorized Organizations.
Manage Users
Section titled “Manage Users”- Click the gear icon to open System Administration.
- Under GENERAL, click Manage Users.
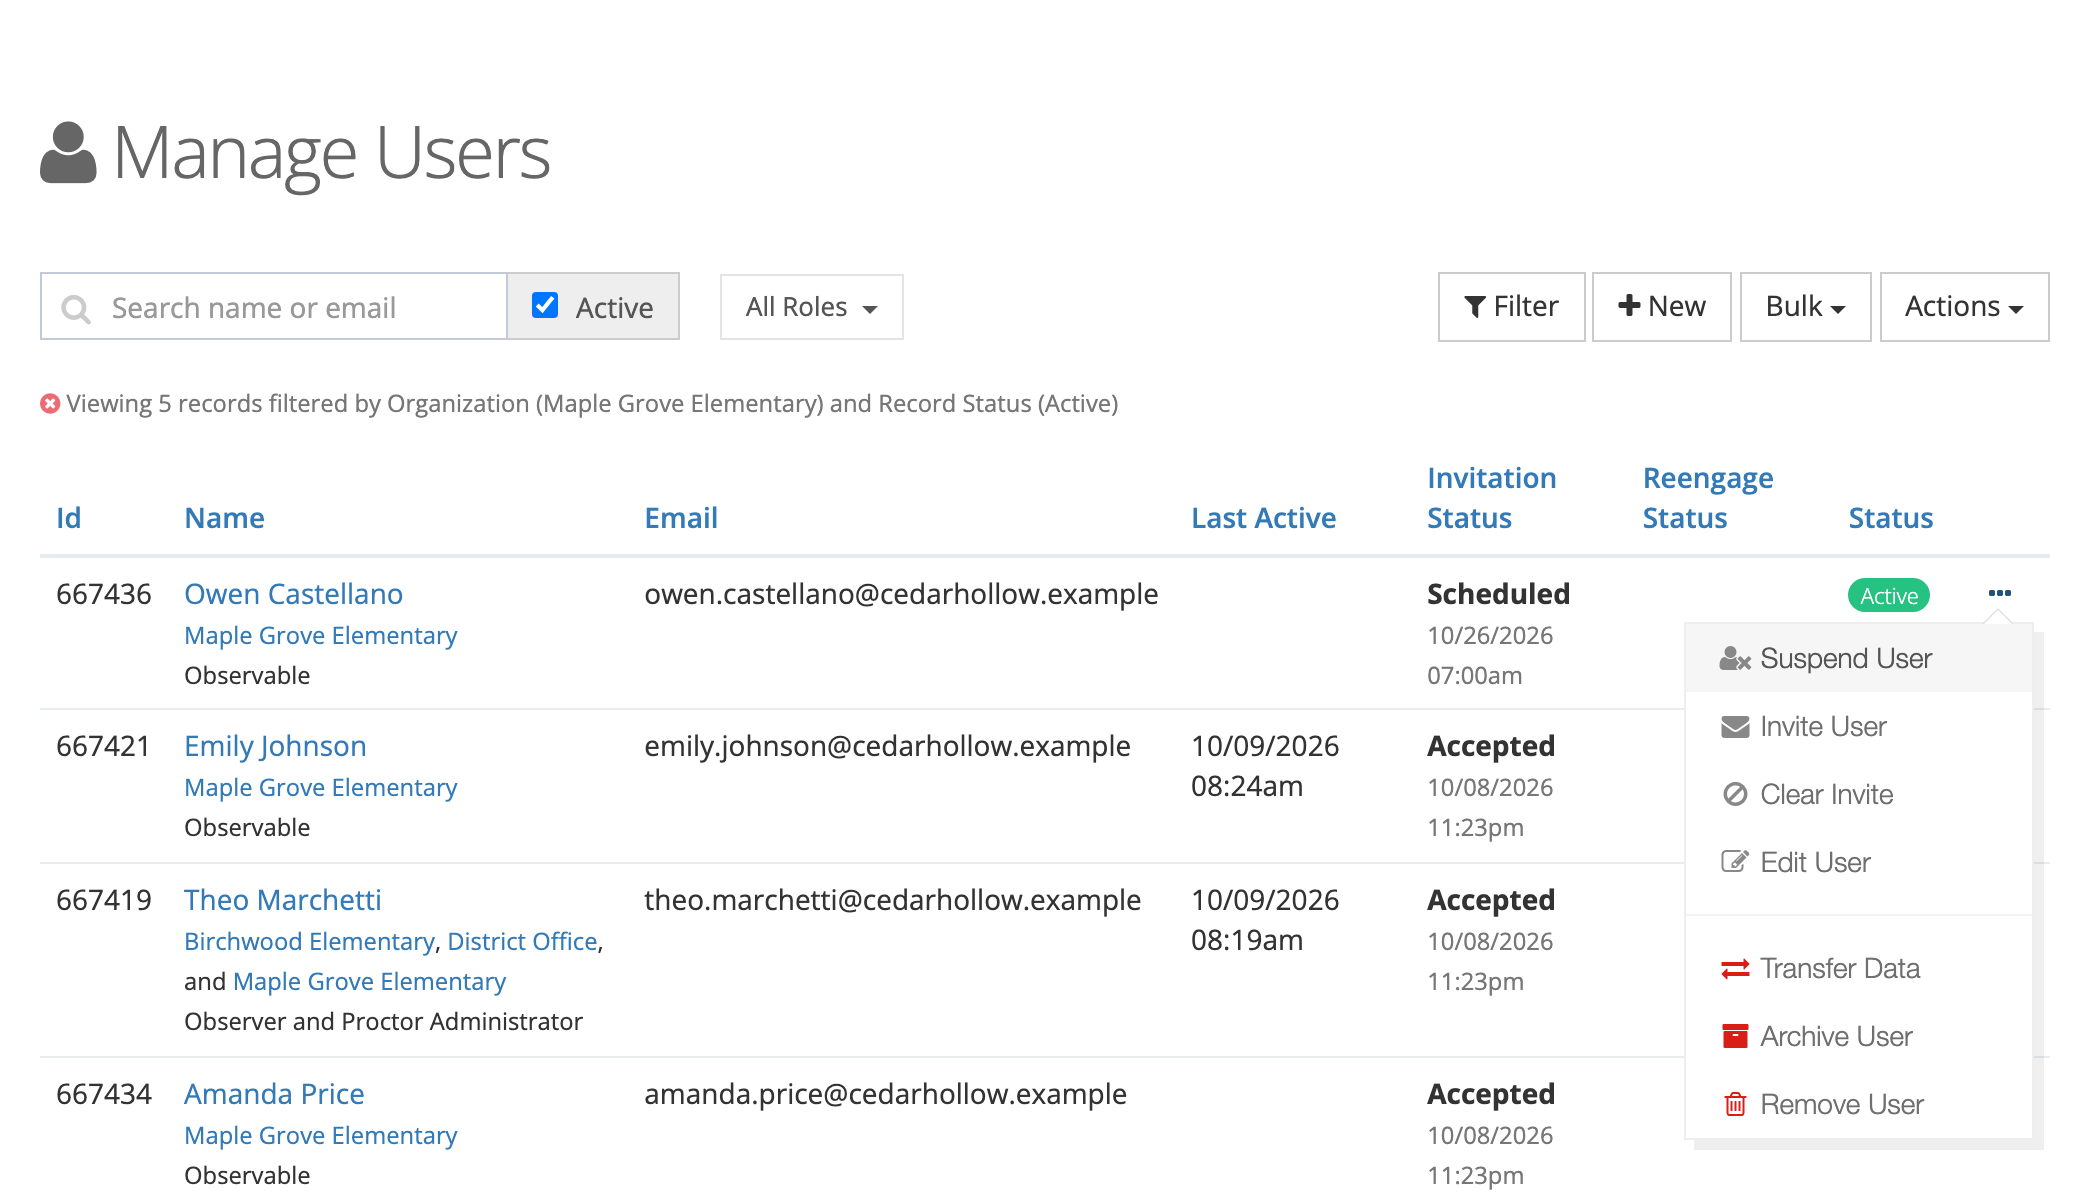
Each row shows the person’s organizations and roles under their name. The columns are Id, Name, Email, Last Active, Invitation Status, Reengage Status, and Status (Active or Archived). Click a column heading to sort. A suspended user has a badge next to their name.
Finding people
Section titled “Finding people”- Search name or email matches first name, last name, or email as you type.
- Active is checked by default and lists only active users. Uncheck it to include archived users.
- All Roles limits the list to one or more roles.
- Filter opens a window where you can choose organizations, specific users, or both. Click Apply Filter.
The line above the table says what the list is filtered by, for example “Viewing 5 records filtered by Organization (Maple Grove Elementary) and Record Status (Active).”
The filters matter for more than finding people: every action in the Bulk menu applies to everyone the list currently shows.
Adding a user
Section titled “Adding a user”- On Manage Users, click New.
- Fill in the New User window (fields below).
- Click Save.
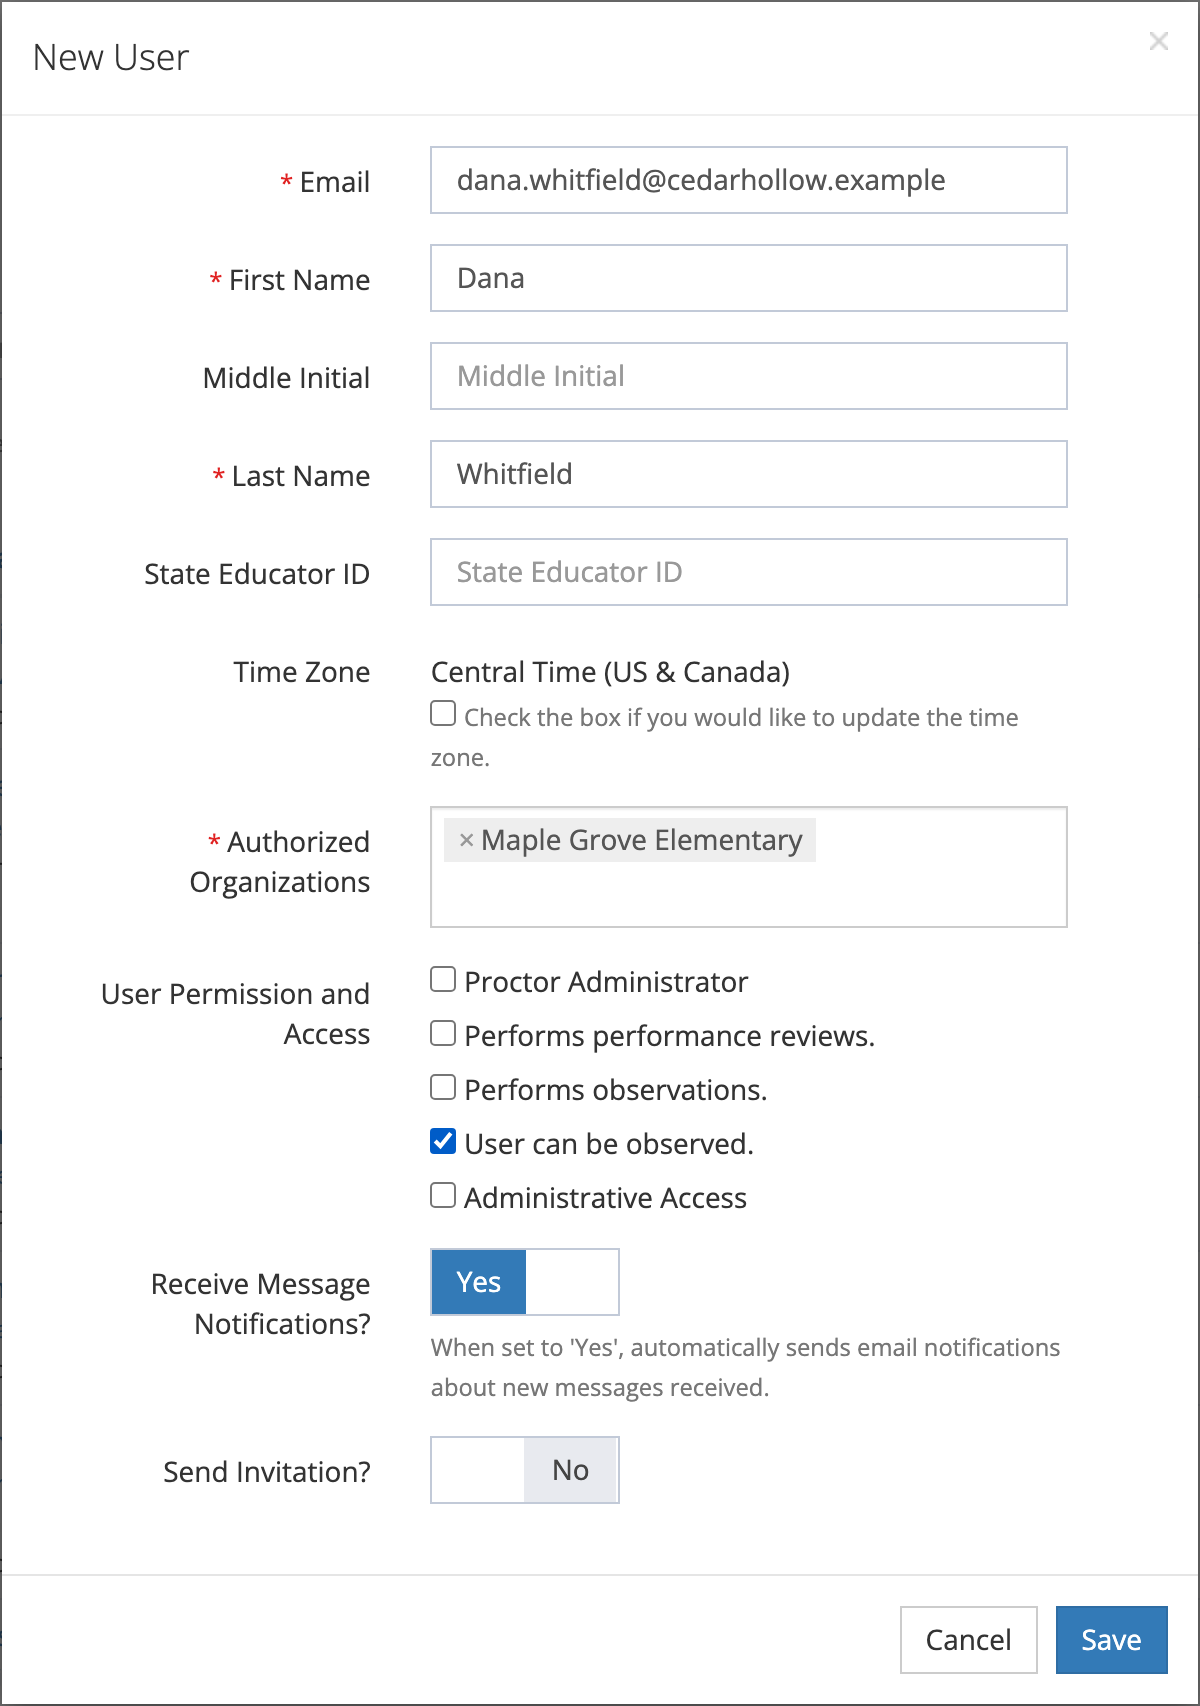
| Field | What it does |
|---|---|
| Required. The person’s sign-in name. It must be unique. | |
| First Name, Last Name | Required. |
| Middle Initial | Optional. |
| State Educator ID | Optional. Shown on the user’s page. |
| Time Zone | Shows the person’s active time zone. To give them a different one (for example, a coach who works remotely from another state), check Check the box if you would like to update the time zone. and choose one. See Time zones. |
| Authorized Organizations | Required. The schools, offices, or groups the person belongs to. You can choose several. |
| User Permission and Access | The roles. See the next section. |
| Receive Message Notifications? | Appears when Enable comments? is on in Observe Settings. Yes emails the person when they receive a new message. |
| Auto Finalize? | Appears when Performs observations. is checked. The value is saved and shown on the user’s page, but it does not change how observations are finalized today. See Settings that belong to each person. |
| Send Invitation? | Yes emails an invitation when you save, or on the date you set in Send When?. See Inviting and Re-engaging Users. |
You can also add a user from a school’s Users tab. The school is then filled in for you.
Roles on the form
Section titled “Roles on the form”The form lists each role by what it does, and the wording changes with the modules your district has. In a district with both weCLIMB and eLearn that does not publish its own content, the boxes read:
| Role | Label on the form |
|---|---|
| Proctor Administrator | Proctor Administrator |
| Evaluator | Performs performance reviews. |
| Observer | Performs observations. |
| Observable | User can be observed. |
Check Administrative Access to show the administrative roles. Checking it turns on all three; uncheck the ones the person should not have:
| Role | Label on the form |
|---|---|
| System Administrator | Manage: Users, Organizations, Transcripts, & Test Results. |
| Reporter | View Reports. |
| Organization Administrator | Manage: Observations, Curriculum Progress, & Transcripts. |
A district that publishes its own content also sees Create and Edit Content. (Publisher), and two administrative labels change: System Administrator reads Manage: Users, Organizations, Test Results, & View Transcripts. and Organization Administrator reads View Observations, Curriculum Progress, & Transcripts.
The list and the user’s page show the role names (for example “Observer and Proctor Administrator”). For what each role can see and do, see User Roles and Permissions.
A typical teacher needs only User can be observed. A principal who observes and runs reports for one school usually gets Performs observations., Organization Administrator, and Reporter, with only that school in Authorized Organizations.
Observable limit
Section titled “Observable limit”If your district has a limit on how many people can be observed, an info icon next to User can be observed. shows the count, for example “Current Observable Limit: 212/220.” Once the limit is reached, the box is disabled for anyone who does not already have the role. To add a teacher, archive someone who has left or remove the role from someone who no longer needs it.
Editing a user
Section titled “Editing a user”Open the row menu (…) and click Edit User, or open the user’s page and click Edit. The Edit User window has the same fields as New User, except Send Invitation?. Click Save.
- Changing Authorized Organizations adds and removes memberships. A teacher who moves from Birchwood to Maple Grove keeps her history and appears in Maple Grove’s lists from then on.
- When you edit your own account, the window leaves out Time Zone, Authorized Organizations, and the roles, so you cannot remove your own access by accident.
- For people your district’s directory manages, the name, email, and directory-granted roles and buildings are locked. See Directory Sync.
The user’s page
Section titled “The user’s page”Click a name to open the user’s page. It shows the person’s email, roles, State Educator ID, time zone, organizations, when they were invited, accepted, and last signed in, and their Auto Finalize setting. Buttons at the top include Edit, Change Password, Suspend Account or Unsuspend Account, Remove, and the invitation buttons.
When weCLIMB is on, the page also has Content Areas and Grade Levels panels (use the edit icon on each to record what the teacher teaches), a My Observations list, and, for observers, Conducted Observations. The content areas and grade levels on a user are for your records; see Class Periods, Content Areas, and Grade Levels.
Change Password sets a password for the person. If your district signs in through single sign-on, the window says passwords cannot be changed here.
Suspending, archiving, and removing
Section titled “Suspending, archiving, and removing”All of these are in the row menu (…). Each opens a window that names the person and asks you to confirm.
| Action | What happens | Use it when |
|---|---|---|
| Suspend User | The person cannot sign in. Nothing else changes. Unsuspend User restores access. | Someone is on leave, or you need to pause an account while you sort something out. |
| Archive User | The account is archived and suspended. The person cannot sign in, and their records stay in reports. | A teacher retires or leaves the district. |
| Activate User | Shown instead of Archive User for an archived person. Keep Account Suspended starts checked; uncheck it to let them sign in again, then click Yes, Activate. | A teacher returns. |
| Remove User | Takes the person out of your district’s account. Their observations and certifications stay visible; their transcripts and course enrollments no longer appear in your reports. | An account was created in your district by mistake. |
| Transfer Data | Moves the person’s courses, transcripts, assessment results and answers, progress, license claims, required products, observations (both those they were in and those they conducted), comments, messages, content areas, and grade levels to another user you choose. Do you want to delete [name]? set to Yes deletes the original account afterward. | The same teacher ended up with two accounts, for example under a personal and a district email. |
To find archived users again, uncheck Active on Manage Users.
Notes:
- You cannot archive, remove, or transfer data from your own account.
- Remove User appears in the Manage Users row menu and as Remove on the user’s page, not on a school’s Users tab. Only system administrators who belong to the district organization see it.
- People your district’s directory manages are suspended and archived by the directory, so those actions do not appear for them.
- For most departures, archive rather than remove. Archiving keeps the teacher’s observations, transcripts, and course history in your reports.
Bulk actions
Section titled “Bulk actions”The Bulk menu applies to every user the list currently shows, not to rows you select. Filter first (for example, to one school and one role), then open the menu. Each window restates the filter and the number of users so you can check before you confirm. The work runs in the background. A progress window appears, and the page reloads when it finishes.
| Menu item | What it does |
|---|---|
| Change Organizations | Replaces the organizations of every listed user with the ones you pick in New Organizations. Leave the box empty to change nothing. Click Apply Changes. |
| Bulk Message | Emails everyone listed who is active and not suspended. Optionally start from Select Email Template, then fill in From, Subject, HTML, and Text. The tags {{first_name}}, {{last_name}}, {{email}}, and {{name}} fill in each person’s details. Click Preview to check it, then Send. |
| Archive Users | Archives and suspends every listed user. Click Yes, Archive Users. |
| Invite Users, Clear Invitations, Re-engage Users, Clear Re-engagements | See Inviting and Re-engaging Users. |
Change Organizations and Archive Users skip people your district’s directory manages. Use Archive Users at the end of a school year to retire the accounts of staff who have left: filter to them first, and check the count in the window before you confirm.
Importing users from a file
Section titled “Importing users from a file”Actions > Sync Users creates and updates many users at once from a CSV or XLSX file. It suits the start of a school year, when HR sends a staff list.
The first row must be the column headers: Email, First Name, Last Name, Authorized Organizations, Roles, Content Areas, Grade Levels, Middle Initial, and State Educator ID. A column with a misspelled header is ignored. The window shows a sample.
| Column | What to put in it |
|---|---|
| Identifies the user. An existing email updates that user. A row with no email is skipped without an error. | |
| First Name, Last Name | Required on every row. A blank name stops the import, even for an existing user. |
| Authorized Organizations | Required. One or more names separated by commas. A school’s short name also works. The user’s organizations are replaced with these. |
| Roles | Role names separated by commas, for example “Observable, Reporter”. These replace the user’s roles, so a blank cell removes an existing user’s roles. An unknown role name stops the import. |
| Content Areas, Grade Levels | Names separated by commas. Saved only for users with the observable role. Grades can be numbers (“1, 2, 3”), “K”, or “PreK”. |
| Middle Initial, State Educator ID | Optional. |
To import:
- Click Actions > Sync Users.
- Set Should email invites be sent?. Yes invites everyone in the file who has no password and has never been invited, after the import succeeds.
- Choose the file under File Selector: and click Sync Users.
Before you import, know how the file is read:
- One error stops everything. If any row has a problem, no users are saved, and a notice lists the line numbers. Fix the file and import it again.
- Unknown names are created. An organization, content area, or grade level that does not match an existing name is added. A misspelled school (“Maple Grove Elem”) becomes a new organization, so check names against Organizations/Groups first.
- Imported users are made active. An archived or suspended user who appears in the file is reactivated.
- The observable limit applies. If the file would take the district past its limit, the import stops.
- People who belong to another district’s account are skipped.
Exporting the list
Section titled “Exporting the list”Actions > Export PDF or Export CSV exports the users the list currently shows. Filter first to export one school or one role.
Organizations and groups
Section titled “Organizations and groups”A user can belong only to organizations that exist on Organizations/Groups. Creating schools and groups, the organization form (including Auto Assign New Users? and Active?), and a school’s page with its Users tab are covered in Setting Up Schools and Groups. Getting a school ready for observations is covered in Getting a School Ready for Observations.