

Administration
Inviting and Re-engaging Users
Send invitations now or on a schedule, clear pending ones, and bring inactive staff back with re-engagement emails.
An invitation is the email that lets a new user set a password and sign in for the first time. It is the usual way to onboard staff, but not the only one. People can also sign in with Passwordless Login on the sign-in page, which emails them a one-time code, or through single sign-on if your district uses it. Neither needs an invitation.
A re-engagement email is a welcome-back message for people who already have an account. It is useful at the start of a semester or before a course deadline.
This article covers inviting one user or a filtered list, scheduling invitations, clearing them, and sending re-engagement emails. All of it happens on Manage Users (gear icon > System Administration > Manage Users).
Role: system administrator. You can invite and re-engage only the users you can see on Manage Users; see How far your access reaches.
Invitation Status and Reengage Status
Section titled “Invitation Status and Reengage Status”The Invitation Status column shows where each person stands. Every invitation action uses this value.
| Status | Meaning |
|---|---|
| Not Sent | No invitation has been sent and none is scheduled. |
| Scheduled | An invitation is waiting to send on the date shown. Nothing has been emailed yet. |
| Sent | The invitation went out on the date shown, but the person has not accepted it. |
| Accepted | The person used the invitation link and set a password, or signed in through single sign-on. |
| Signed In | The person has signed in without accepting an invitation, for example through Passwordless Login. |
Accepted and Signed In both mean the person has access. Invitation actions skip them.
The Reengage Status column shows Scheduled with the date while a re-engagement email is waiting, and Sent with the date for a week after one goes out. After that week the column is blank again.
The user’s own page also shows Invitation Status, Invitation Sent, Invitation Accepted, and Last Sign In.
Inviting one user
Section titled “Inviting one user”- On Manage Users, open the person’s row menu (…) and click Invite User. (On the user’s page, click Invite.)
- To send later, set Send When? to a date and time. Leave it empty to send now.
- Click Yes, Invite User.
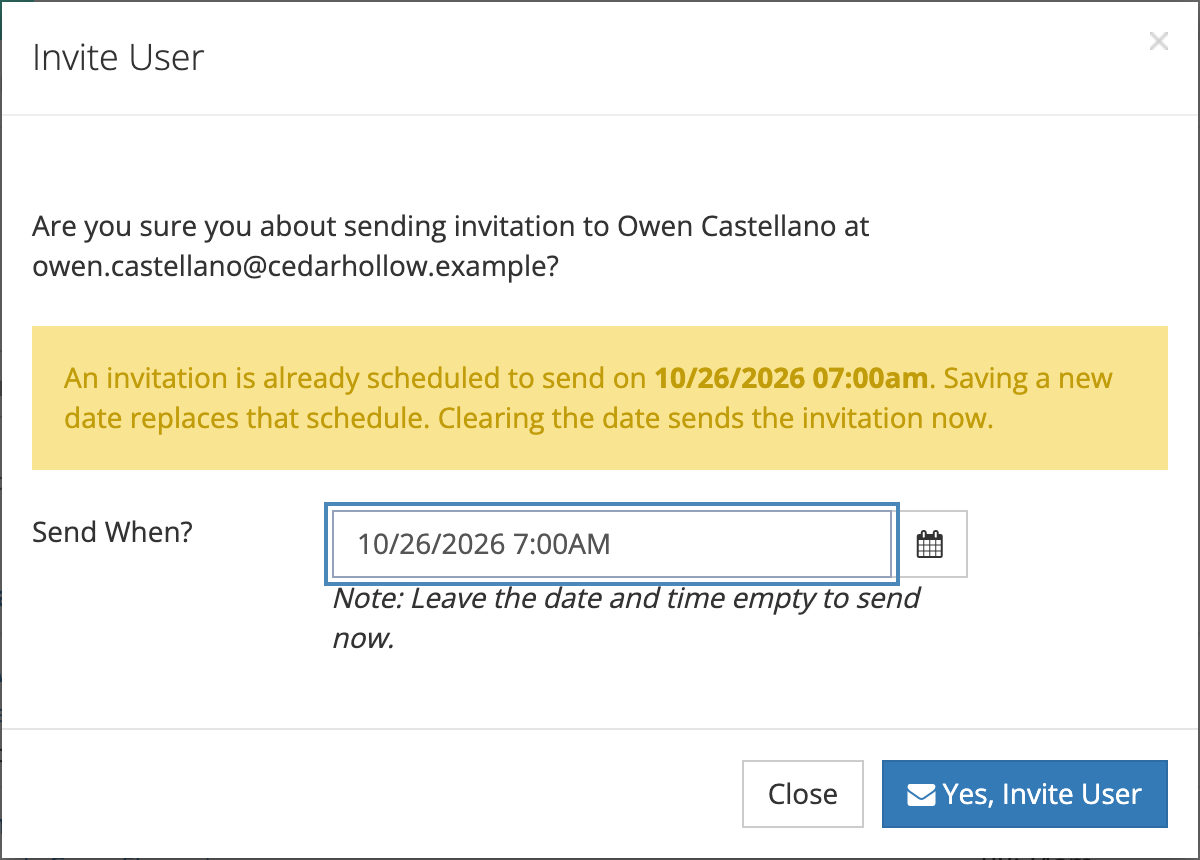
If the person already has an invitation scheduled, the window says when and prefills Send When? with that date. Saving a new date replaces the schedule. Clearing the date sends the invitation now.
Invite User appears only for people who are active, not suspended, have no password, and have never signed in. Setting a password for someone with Change Password makes them ineligible, since they can already sign in.
Inviting when you create the user
Section titled “Inviting when you create the user”The New User window has Send Invitation?. Set it to Yes, and a Send When? field appears. Leave the date empty to send when you save, or set a date to schedule it. The Edit User window has no invitation settings, so editing a user never changes a scheduled invitation. See Managing Users and Organizations.
Clearing one invitation
Section titled “Clearing one invitation”Click Clear Invite in the row menu or on the user’s page, then Clear Invitation to confirm.
- For a Scheduled invitation, the email is never sent. The person never knew it was planned.
- For a Sent invitation, the link stops working. Anyone who clicks it afterward lands on the sign-in screen.
You can invite the person again at any time.
How bulk actions choose their users
Section titled “How bulk actions choose their users”Like every Bulk action (see Bulk actions), these apply to everyone the list currently shows, not to rows you select. To invite one school, filter to that school first, then open Bulk.
- Each window restates the filter, for example “As filtered by Organization (Maple Grove Elementary) and Record Status (Active).”
- With Active checked (the default), archived users are left out. Uncheck Active and they are counted, but suspended and archived users are never emailed. They appear as Not eligible.
- The work runs in the background. A progress window appears while the emails are queued, and the page reloads when it finishes.
Inviting a filtered list
Section titled “Inviting a filtered list”- Filter Manage Users to the people you want to invite.
- Click Bulk > Invite Users.
- In the Invite All window, under Who should be invited?, check the groups to include.
- To send later, set Send When?. Leave it empty to send now.
- Click Send Invitations.
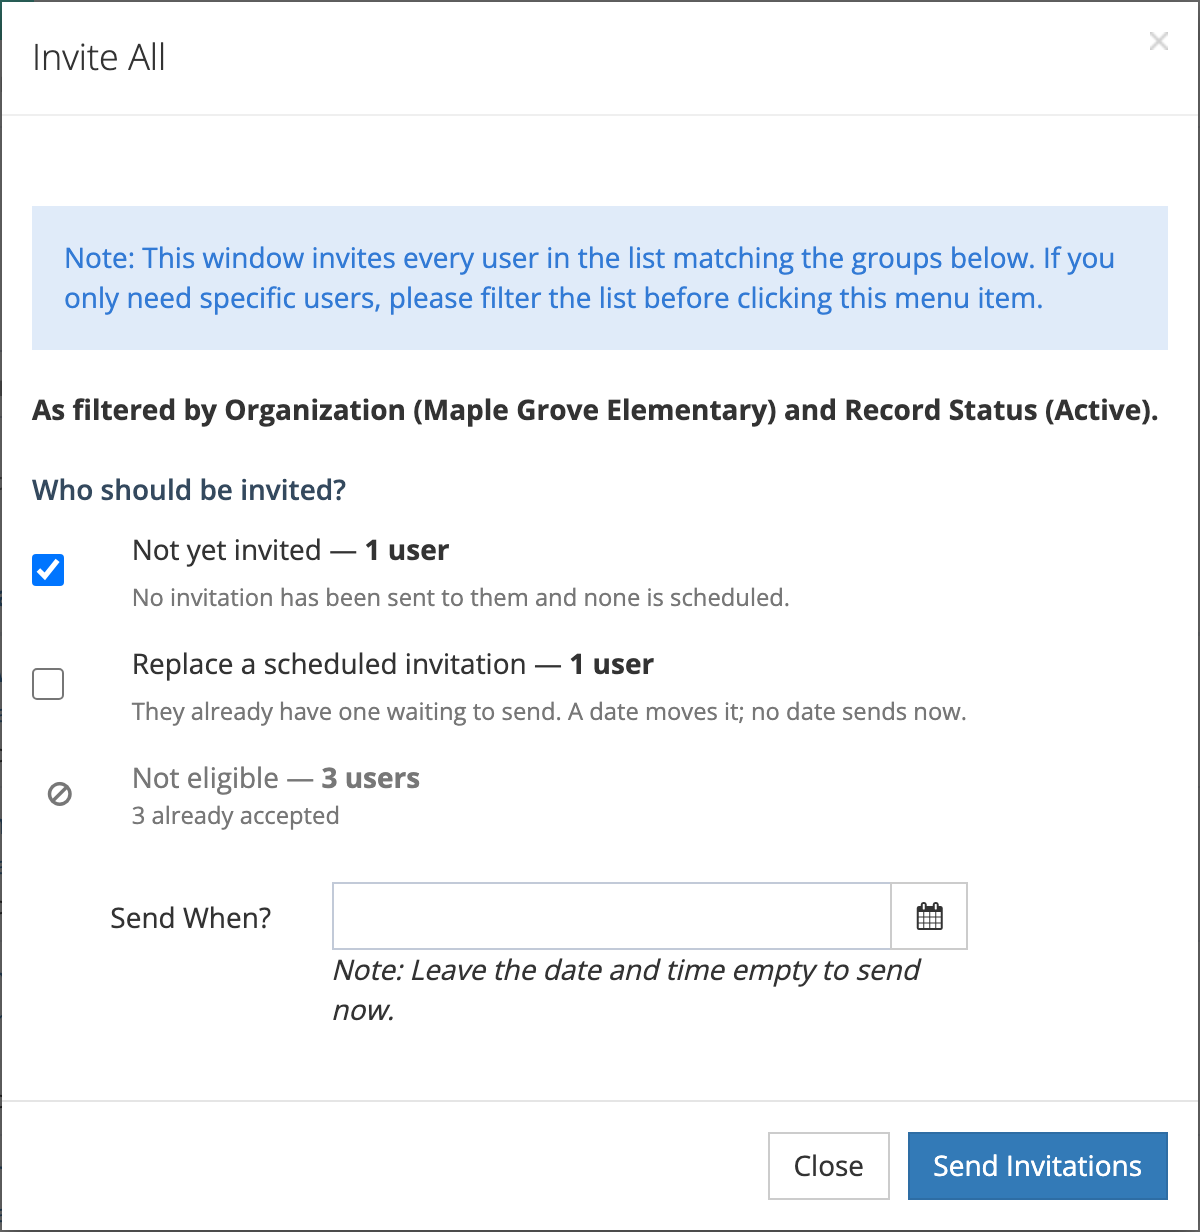
The window splits the list into groups with a count for each. A group with nobody in it is not shown.
| Group | Checked by default | What happens |
|---|---|---|
| Not yet invited | Yes | They get an invitation. |
| Re-send to users already invited | No | They get the same invitation link again. Skipped if you set a date in Send When?. |
| Replace a scheduled invitation | No | They already have one waiting. A date moves it; no date sends it now. |
| Not eligible | (not selectable) | Lists why, for example “already accepted,” “already have a password,” “have already signed in,” or “suspended or archived.” |
Re-sends work only when sending now. A scheduled re-send would leave the status reading Sent while a second invitation waited unseen, so the window skips that group when a date is set.
If nobody in the list can be invited, the window says “No users in this list can be invited,” explains why, and has no send button.
Clearing invitations in bulk
Section titled “Clearing invitations in bulk”Use this to withdraw invitations after a staffing change, or when a batch was scheduled for the wrong day.
- Filter the list.
- Click Bulk > Clear Invitations.
- Under Which invitations should be cleared?, check the groups to clear.
- Click Clear Invitations.
| Group | What happens |
|---|---|
| Already sent | Their invitation link stops working and takes them to the sign-in screen. |
| Scheduled, not yet sent | The invitation emails will not be sent. |
Both groups are checked by default. People who already accepted are never included. If you uncheck both, nothing is cleared.
Re-engagement emails
Section titled “Re-engagement emails”- Filter Manage Users to the people you want to reach.
- Click Bulk > Re-engage Users.
- Read the Who gets what? breakdown.
- To send later, set Send When?. Leave it empty to send now.
- Click Send Emails.
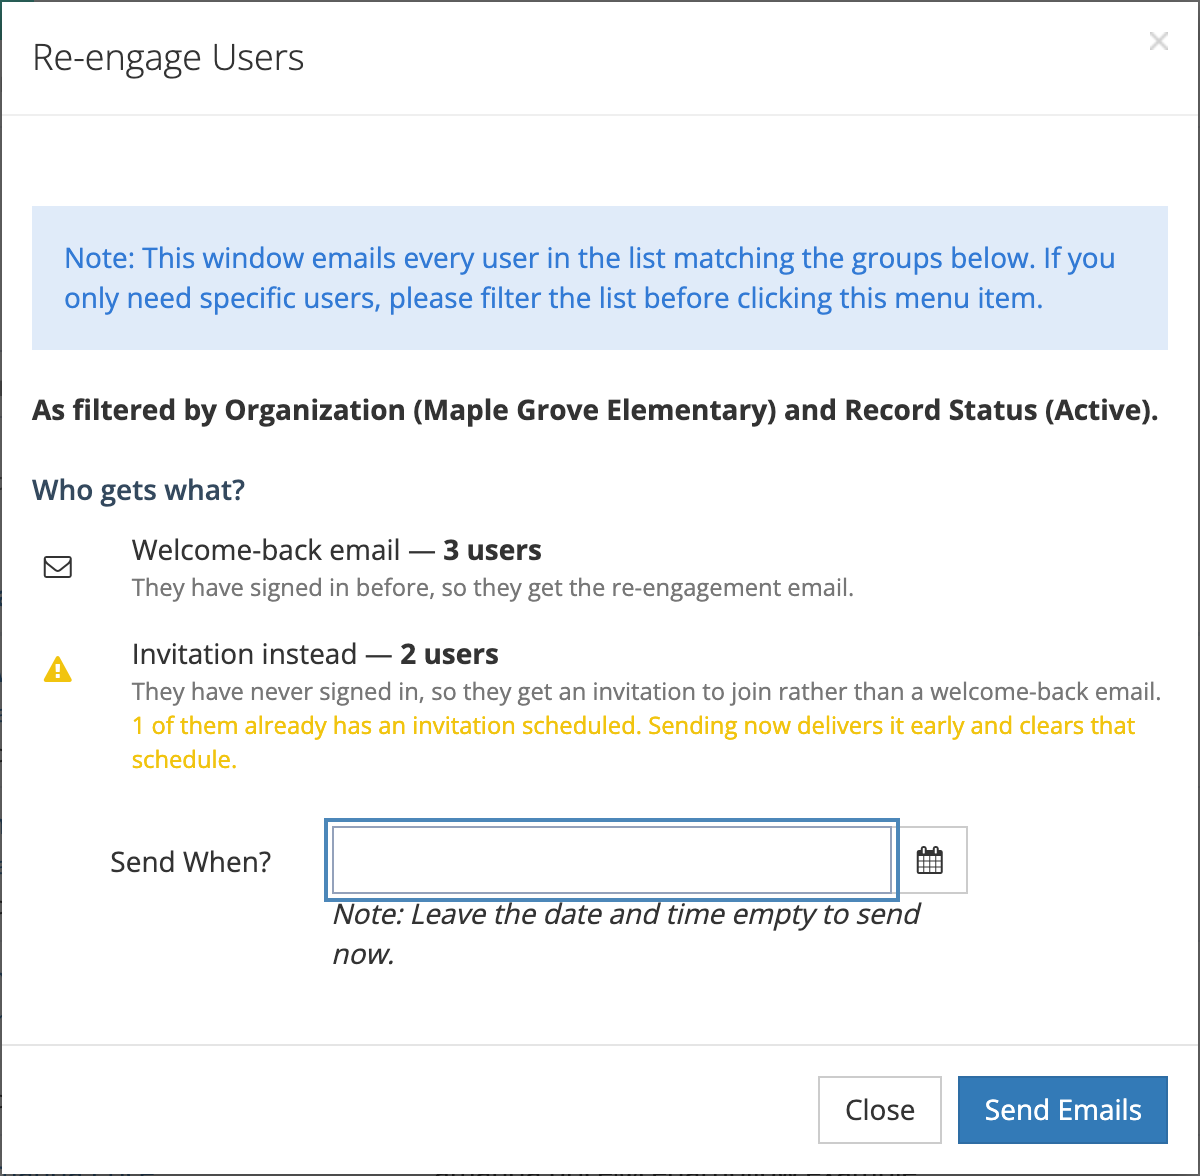
Not everyone gets the same email:
| Group | What they get |
|---|---|
| Welcome-back email | People who have signed in before get the re-engagement email. The standard email includes a link to sign in and a Forgot your password? link. |
| Invitation instead | People who have never signed in get an invitation instead. |
| Not eligible | Suspended and archived users are never emailed. |
Check the Invitation instead count before you send. It includes everyone who was created but never onboarded, which is often more people than you expect. If some of them already have an invitation scheduled, the window warns you: sending now delivers that invitation early and clears its schedule.
If some people already have a re-engagement email scheduled, a checkbox lets you Also include them. It is unchecked by default, so running the action again does not disturb emails you already lined up. When checked, a date moves their scheduled email and no date sends it now.
Clearing scheduled re-engagement emails
Section titled “Clearing scheduled re-engagement emails”- Filter the list.
- Click Bulk > Clear Re-engagements.
- Check the count in the Clear Re-engagement Emails window.
- Click Clear Re-engagement Emails.
Only scheduled emails can be cleared. An email that has already gone out cannot be recalled.
Scheduling notes
Section titled “Scheduling notes”- Send When? works the same way in every window: leave it empty to send now, or pick a date and time to send later.
- The date and time are read in your own time zone. When the person (or the district) is in a different zone, the window shows your zone under the field.
- Scheduled invitations and re-engagement emails go out within about five minutes of the time you set.
- A scheduled send is skipped if the person is suspended or archived by then.
What the person sees
Section titled “What the person sees”The standard invitation email welcomes the person, lists the roles you gave them, and includes their sign-in address and an invitation link. The link opens an Accept Invitation page where they enter Create Password and Confirm Password, then click Set my password. They are then signed in, and their status changes to Accepted.
If your district signs in through single sign-on, the link sends them to your district’s sign-in page instead, and the invitation is marked accepted.
The wording of the invitation and welcome-back emails cannot be edited from System Administration.
Common tasks
Section titled “Common tasks”- Onboarding a new school mid-year: add or import the users, filter to that school, then Bulk > Invite Users with Not yet invited checked.
- Timing invitations to a training day: filter to the group and set Send When? to the morning of the session, so the link arrives when they need it.
- A batch was scheduled for the wrong day: Bulk > Clear Invitations with Scheduled, not yet sent checked, then invite again with the right date. Or use Invite Users with Replace a scheduled invitation checked and the new date.
- Chasing people who never responded: filter the list, then Bulk > Invite Users, check Re-send to users already invited, and leave the date empty.
- Start-of-semester reminder: Bulk > Re-engage Users, and read the Invitation instead count first so you know how many people are being onboarded rather than reminded.
- Someone left before accepting: Clear Invite from their row menu invalidates the link. Then archive the account (see Managing Users and Organizations).